Gelcoat Stress Crack Repair
I wouldn't say that cracks are always caused by fiberglass damage. Gelcoat doesn't flex, so spider cracks can result from flexing of the hull. People run much more ballast than some boats are designed for, so spider cracks begin to appear, but not nescisserily fiberglass damage. How to fix crazing in gelcoat, also known as spider cracks or stress cracks which plague countless boaters.
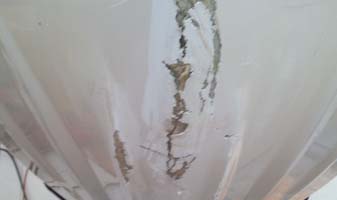
Gelcoat Repair On Boats By Lenny Rudow Crazing in gelcoat, also known as spider cracks or stress cracks, plagues countless boaters. Here's how to fix the problem. Crazing is an incredibly common issue on modern fiberglass boats, and although it usually starts off as a matter of cosmetics, in severe cases these surface cracks can grow, deepen, and eventually threaten your boat's structural integrity. They usually form in areas where the fiberglass is under unusual stress (such as rail stanchion and anchor pulpit attachment points, transom corners, and around hardware), or in areas where significant impacts have occurred, such as rub-rail collision zones or where a heavy object was dropped. You'll want to fix them quickly because they can grow worse over time — but don't worry, it isn't a hard job.
With a little bit of know-how and a few basic tools, you can tackle this task on your own. Alternate iframe text Before You Begin If the cracks on your boat were caused by impacts, such as around rub rails or where a heavy object was dropped, move on to Step 1. If, however, the spider cracks appeared at an attachment point or in a high-stress area, there's a good chance they'll simply return after you fix them. In this case, before you attack a single crack, you need to reinforce the area. Adding (or up-sizing) backing plates to attachment points and bracing to high-stress areas is probably going to be necessary. There's some chance you'll discover the need for significant repair work, such as a broken bulkhead, which is best left to a pro.

But in most cases, DIY reinforcements should do the trick. How will you know if the reinforcing job you've done is sufficient?
Results of program za dekodiranje svih mobitela: Free download software, Free Video dowloads, Free Music downloads, Free Movie downloads, Games. Program Za Dekodiranje Mobitela Samsung Cell. Dekodiranje Mobitela Samsung. This action might not be possible to undo. Možete skinuti program koji otključava sve mobitele. Download software program za dekodiranje mobitela samsung.
The Exorcist Movie Download In Hindi, Download the latest released Bollywood HD Movies, Games and Software directly from Torrent. Wapking and DJmaza official mp4, 3gp, avi videos. The exorcist full movie youtube. The Exorcist Movie In Hindi, Download the latest released Bollywood HD Movies, Games and Software directly from Torrent. Wapking and DJmaza official mp4, 3gp, avi videos.
There's really no way to be sure, until you repair the crazing and see if the cracks come back. Step 1: Prep The Area For Crack Removal Before you can start to fix crazing, clear the area of any obstructions and remove all hardware that covers or obscures any part of the cracks. Then, get busy cleaning. Thoroughly wash and dry the area, and remove all obvious surface contaminants with a rag dipped in a strong solvent like acetone.
Step 2: Sand The Surface Always use a sanding block when sanding. It'll prevent you from accidentally pressing too hard in one area, and inadvertently creating a low spot. On curved surfaces, use flexible foam or rubber blocks.
A surface area at least a quarter-of-an-inch wide (including the crack itself) will need to be sanded with medium-grit sandpaper. If you're dealing with a few long cracks that are separated by an inch or more, you can sand each one individually; otherwise sand the entire area of cracking. Sand the fiberglass down until there's no shine left, so you know the gelcoat's surface has been removed. In the case of very fresh, shallow crazing, sanding alone may remove some or all of the cracks.
Step 3:Grind Out The Cracks Fit your Dremel with a silicon carbide or tungsten carbide bit, in a bullet or cone shape. Using the highest speed possible (bits turning at lower speeds tend to grab and rip the gelcoat, causing chips and splinters instead of a smoothly ground surface), start at one end of each remaining crack and grind all the way to its other end. You'll need to grind down through the crack until you've exposed uncracked gelcoat or fiberglass beneath the surface, but don't try to rush this part of the job; let the bit and its speed do the work, as opposed to applying a lot of pressure. It's usually best to run the Dremel along each crack lightly then go back and do it again, as opposed to trying to grind deeply on the first pass. Step 4: Prep The Area For Filling And Patching Once all the cracks have been ground away with the Dremel, re-sand the area with the sandpaper to smooth out any rough edges or burrs.